531 lines
25 KiB
Markdown
531 lines
25 KiB
Markdown
# Pi-Hosted <a href='https://ko-fi.com/cjgameslive' target='_blank'><img height='35' align='right' style='border:0px;height:46px;' src='https://storage.ko-fi.com/cdn/kofi3.png?v=6' border='0' alt='Buy Me a Coffee at ko-fi.com' /></a>
|
||
|
||
I've used the ARM64 Template to pull my Docker images from [Pi-Hosted](https://github.com/pi-hosted/pi-hosted), these are just a few notes to remind me how I set a few thing up should anything happen to my Pi.
|
||
|
||
You can install various remote file browsers and terminals to access your set up online but I like using [Portable Apps](https://portableapps.com/) to run various programs, for Pi-Hosted stuff I would recommend checking out [Kitty](https://portableapps.com/apps/internet/kitty-portable) (there's also [PuTTY](https://portableapps.com/apps/internet/putty_portable) if you prefer) for SSH and [FileZilla](https://portableapps.com/apps/internet/filezilla_portable) for SFTP.
|
||
|
||
If you find any of this useful and would like to buy us a coffee please use the link at the top of this page.
|
||
|
||
<details>
|
||
# <summary><h4>Getting permission denied error when trying to access folders ❓</h4></summary>
|
||
|
||
By default some folders are set up with different access meaning you may not have access to them (777 means everyone can read / write / execute, 755 means everyone can read / execute but ownly the owner can write, 644 means everyone can execute but only the owner can read / write. 777 is a major security risk and should never be used.)
|
||
|
||
The easiest way to gain SFTP access is to change the file ownership from `root` to your user (in this example `pi`):
|
||
```
|
||
sudo chown -R [user]:[group] [folder]
|
||
```
|
||
|
||
e.g.
|
||
```
|
||
sudo chown -R pi:pi /portainer/Files/Plex/Movies
|
||
```
|
||
to change ownership back to its defult:
|
||
|
||
```
|
||
sudo chown -R root:root /portainer/Files/Plex/Movies
|
||
```
|
||
|
||
</details>
|
||
|
||
<details>
|
||
<summary><h2>Setting up Docker and Portainer</h2></summary>
|
||
|
||
First ensure git is installed by typing `git` into the terminal, if it's not then run `sudo apt install git`.
|
||
|
||
*Optional:* Check what folers are already there by running `ls` and select one, or make one by running `mkdir <folder>` so that any prerequisite scripts are stored in one place and `cd <folder>` to enter the new folder`.
|
||
|
||
#### 1. First install docker:
|
||
|
||
```
|
||
wget -qO- https://raw.githubusercontent.com/pi-hosted/pi-hosted/master/install_docker.sh | bash
|
||
```
|
||
|
||
Then reboot for good measure
|
||
```
|
||
sudo reboot
|
||
```
|
||
|
||
#### 2. Install Portainer:
|
||
|
||
```
|
||
wget -qO- https://raw.githubusercontent.com/pi-hosted/pi-hosted/master/install_portainer.sh | bash
|
||
```
|
||
|
||
#### 3. Log in
|
||
Go to your Pi's IP followed by `:9000` in the browser to set up your account (e.g. `192.168.1.22:9000`)
|
||
|
||
Pick your username and password to create a user, select the Docker installation and click connect, click on your local installation, go to setting and enter your template.
|
||
|
||
<details>
|
||
<summary>Where to get your app template:</summary>
|
||
<br>
|
||
|
||
I'm using `https://raw.githubusercontent.com/pi-hosted/pi-hosted/master/template/portainer-v2-arm64.json` but you can find different templates depending on your OS over on the [Pi-Hosted](https://github.com/pi-hosted/pi-hosted) GitHub page.
|
||
|
||
</details>
|
||
|
||
<details>
|
||
<summary>How to update Portainer:</summary>
|
||
<br>
|
||
|
||
```
|
||
wget -qO- https://raw.githubusercontent.com/pi-hosted/pi-hosted/master/update_portainer.sh | bash
|
||
```
|
||
|
||
</details>
|
||
|
||
</details>
|
||
|
||
<details>
|
||
<summary><h2>Setting up <a href="https://github.com/bastienwirtz/homer/" target="_blank">Homer</a></h2></summary>
|
||
|
||
Find the Homer template in the App Templates list, click it and `Deploy the container`.
|
||
|
||
To edit your dashboard SSH in and edit `config.yml`:
|
||
```
|
||
sudo nano /portainer/Files/AppData/Config/Homer/assets/config.yml
|
||
```
|
||
|
||
Here you can change your dashboard title, subtitle, logo, default theme, etc. You can find my anonymised config [here](Homer/config.yml).
|
||
|
||
You can use icons for your various apps by using font awesome (such as a cloud `icon: "fas fa-cloud"`) or by uploading your own logos to the Pi (such as nginx `logo: "assets/icons/nginx.png"` which would be saved to `/portainer/Files/AppData/Config/Homer/assets/icons/`).
|
||
|
||
You can also display some custom service information, such as if PiHole is enabled and the % of blocked queeries by adding a type to the yml (`type: "PiHole"`). For a full list of available custom service information you can check [here](https://github.com/bastienwirtz/homer/blob/main/docs/customservices.md).
|
||
|
||
</details>
|
||
|
||
<details>
|
||
<summary><h2>Setting up <a href="https://github.com/benphelps/homepage" target="_blank">Homepage</a></h2></summary>
|
||
|
||
Find the Homer template in the App Templates list, click it and `Deploy the container`.
|
||
|
||
Ensure there are 3 volume links:
|
||
|
||
container: `/app/config` host:`/portainer/Files/AppData/Config/Homepage`
|
||
|
||
container: `/app/public/images` host:`/portainer/Files/AppData/Config/Homepage/icons`
|
||
|
||
container: `/var/run/docker.sock` host:`/var/run/docker.sock`
|
||
|
||
You can find more settings for Homepage [here](Homepage)
|
||
|
||
</details>
|
||
|
||
<details>
|
||
<summary><h2>Setting up <a href="https://github.com/go-shiori/shiori" target="_blank">Shiori</a></h2></summary>
|
||
|
||
Find the Homer template in the App Templates list, click it and `Deploy the container`.
|
||
|
||
Default username and password:
|
||
```
|
||
username: shiori
|
||
password: gopher
|
||
```
|
||
|
||
</details>
|
||
|
||
<details>
|
||
<summary><h2>Setting up <a href="https://github.com/pi-hosted/pi-hosted/blob/master/docs/rpi_docker_monitor.md" target="_blank">RPi Docker Monitor</a></h2></summary>
|
||
|
||
RPi Docker Monitor is one of the more involved installs, I would suggest checking out the link above and following all the steps as this will vary depending on your install. Below are the instructions I need.
|
||
|
||
#### 1. Enable c-groups
|
||
First we need to enable c-groups by editing 1cmdline.txt`:
|
||
```
|
||
sudo nano /boot/cmdline.txt
|
||
```
|
||
|
||
Add this to the beginning of the line:
|
||
```
|
||
systemd.unified_cgroup_hierarchy=0 cgroup_enable=memory cgroup_memory=1
|
||
```
|
||
|
||
Reboot:
|
||
```
|
||
sudo reboot
|
||
```
|
||
|
||
Once you are logged back in confirm that c-groups are enabled by running
|
||
```
|
||
cat /proc/cgroups
|
||
```
|
||
|
||
and you should see something like this
|
||
```
|
||
#subsys_name hierarchy num_cgroups enabled
|
||
cpuset 9 15 1
|
||
cpu 7 69 1
|
||
cpuacct 7 69 1
|
||
blkio 8 69 1
|
||
memory 11 158 1
|
||
devices 3 69 1
|
||
freezer 5 16 1
|
||
net_cls 2 15 1
|
||
perf_event 6 15 1
|
||
net_prio 2 15 1
|
||
pids 4 76 1
|
||
rdma 10 1 1
|
||
```
|
||
|
||
#### 2. Folder Setup Script
|
||
Run the below:
|
||
```
|
||
wget -qO- https://raw.githubusercontent.com/pi-hosted/pi-hosted/master/tools/rpi_docker_monitor.sh | bash
|
||
```
|
||
|
||
You should see an output like this:
|
||
```
|
||
Checking if you are online...Online. Continuing.
|
||
Creating directories...
|
||
Downloading Prometheus config files if they don't exist
|
||
--2022-12-10 10:15:17-- https://raw.githubusercontent.com/oijkn/Docker-Raspberry-PI-Monitoring/main/prometheus/prometheus.yml
|
||
Resolving raw.githubusercontent.com (raw.githubusercontent.com)... 185.199.109.133, 185.199.110.133, 185.199.111.133, ...
|
||
Connecting to raw.githubusercontent.com (raw.githubusercontent.com)|185.199.109.133|:443... connected.
|
||
HTTP request sent, awaiting response... 200 OK
|
||
Length: 163 [text/plain]
|
||
Saving to: ‘/portainer/Files/AppData/Config/prometheus/config/prometheus.yml’
|
||
|
||
/portainer/Files/AppData/Config/prometheus/config/prometheu 100%[========================================================================================================================================>] 163 --.-KB/s in 0s
|
||
|
||
2022-12-10 10:15:17 (3.77 MB/s) - ‘/portainer/Files/AppData/Config/prometheus/config/prometheus.yml’ saved [163/163]
|
||
|
||
Setting permissions...
|
||
Done You are ready to goto next step in the install document
|
||
```
|
||
|
||
#### 3. Install the app template
|
||
|
||
Go to the Docker apps templates and find `Raspberry Pi Docker Monitor`, you don't have to change anything here but you can update the data retention period from 15 days if you wish before deploying the stack.
|
||
|
||
#### 4. Setup Grafana
|
||
|
||
Go to your Pi's IP followed by `:3000` in the browser to set up your account (e.g. `192.168.1.22:3000`) and enter the default log in (Username: `admin` Password: `admin`)
|
||
|
||
Navigate to `Cog > Configuration > Data Sources > Prometheus`
|
||
|
||
Under `HTTP` enter the `URL`:
|
||
```
|
||
http://monitoring-prometheus:9090/
|
||
```
|
||
|
||
Navigate to `Dashboards > Import` and paste everything from the below page into the `Import via panel json` panel:
|
||
https://raw.githubusercontent.com/pi-hosted/pi-hosted/master/configs/rpi_dashboard/arm_rpi_dashboard.json
|
||
|
||
If the container crashes and will not load just run the below and reload the page:
|
||
```
|
||
wget -qO- https://raw.githubusercontent.com/pi-hosted/pi-hosted/master/tools/rpi_docker_monitor.sh | bash
|
||
```
|
||
|
||
#### Resolving issues
|
||
|
||
If there are issues loading RPi Monitor try running the following script:
|
||
|
||
```
|
||
wget -qO- https://gitea.cjgameslive.com/CJ/Pi-Hosted/raw/branch/main/Tools/rpi_docker_monitor.sh | bash
|
||
```
|
||
|
||
</details>
|
||
|
||
<details>
|
||
<summary><h2>Setting up <a href="https://nextcloud.com/" target="_blank">NextCloudPi</a></h2></summary>
|
||
|
||
Find the NextcloudPi template in the App Templates list, click it and `Deploy the container`.
|
||
|
||
Go to `https://` followed by your Pi's IP followed by `:8443` in the browser to set up your account (e.g. `https://192.168.1.22:8443`)
|
||
|
||
:warning: Take note of your username (`ncp`) and password before clicking `Activate` or you will have to remove everything and redeploy the container :warning:
|
||
|
||
Once NextCloud has finished activating go to `https://` followed by your Pi's IP followed by `:4444` in the browser to set up your account (e.g. `https://192.168.1.22:4444`). For the page to load you will have to ignore the security warning and enter your username and the top admin user password you coppied.
|
||
|
||
Run the configuration wizard and go to the web pannel when prompted, navigate to `nc-trusted-domains` and add your Raspberry Pi's IP address as a trusted domain (along with any other domains you intend to access NextCloud with). Go through the other settings when you have time and update as necessary, especially the `nc-admin` tab where you can set a new password.
|
||
|
||
<details>
|
||
<summary><h4>Trusted domains not working ❓</h4></summary>
|
||
|
||
You can manually add trusted domains by editing the `config.php`:
|
||
`sudo nano /portainer/Files/AppData/Config/ncdata/nextcloud/config/config.php`
|
||
|
||
Just look for the `trusted_domains` array.
|
||
|
||
</details>
|
||
|
||
Go to `https://` followed by your Pi's IP followed by `:8443` in the browser to set up your account (e.g. `https://192.168.1.22:8443`) and enter your username and the bottom password you coppied and you should be in.
|
||
|
||
Click on your profile image and apps to add any apps, including the ability to edit files within next cloud or make calls through the platform.
|
||
|
||
Click on your profile and settings to find server settings, change your password, update your profile information.
|
||
|
||
If the container crashes or fails to load just run the below and restart the container:
|
||
```
|
||
wget -qO- https://gitea.cjgameslive.com/CJ/Pi-Hosted/raw/branch/main/Tools/reset_premissions_nextcloud.sh | bash
|
||
```
|
||
|
||
</details>
|
||
|
||
<details>
|
||
<summary><h2>Setting up <a href="https://github.com/pi-hosted/pi-hosted/blob/master/docs/nginx_proxy_manager.md" target="_blank">Nginx Proxy Manager</a></h2></summary>
|
||
|
||
Nginx Proxy Manager is one of the more involved installs, I would suggest checking out the link above and following all the steps. Below are the instructions I need.
|
||
|
||
:warning: Remember to expose ports 80 and 443 on your router if you want external network access. Please ensure you set up sufficent network security before opening any ports on your network, and check that the required ports are not blocked by your ISP.
|
||
|
||
#### 1. Folder Setup Script
|
||
Run the following script:
|
||
|
||
```
|
||
wget -qO- https://git.io/JPXF5 | sudo bash
|
||
```
|
||
|
||
Your output should look something like this:
|
||
|
||
```
|
||
# wget -qO- https://git.io/JPXF5 | sudo bash
|
||
Creating directories...
|
||
Creating a blank nginx-proxy-manager config files
|
||
Setup complete. You can now install the stack using the App Template.
|
||
```
|
||
|
||
Alternalively run:
|
||
```
|
||
wget qO- https://gitea.cjgameslive.com/CJ/Pi-Hosted/raw/branch/main/Tools/nginx-proxy-manager.sh | sudo bash
|
||
```
|
||
|
||
#### 2. Install the app template
|
||
|
||
Find the Nginx Proxy Manager v2 with Mysql template in the App Templates list, click it, set the Time Zone (TZ), Database password, MYSQL password, and `Deploy the container`.
|
||
|
||
Go to the `nginx-proxy-manager` logs in Portainer and ensure everything is set up.
|
||
|
||
#### 3. Log In
|
||
|
||
Go to your Pi's IP followed by `:81` in the browser to set up your account (e.g. `192.168.1.22:81`) and enter the default log in (Username: `admin@example.com` Password: `changeme`). You will be prompted to set up your admin account after your first log in.
|
||
|
||
<details>
|
||
<summary><h4>Gateway Error when trying to log in ❓</h4></summary>
|
||
|
||
When I first tried this I could not log in to the admin dashboard, it was pretty easy to solve.
|
||
|
||
1. Go back to Portainer and stio the `nginx-proxy-manager` container.
|
||
2. Go to the `nginx-proxy-manager-db-1` container and enter the `Console`, click `Connect`
|
||
3. Enter `mysql -u root -p npm` and enter the password you set during installation.
|
||
4. Enter `SHOW DATABASES;` and look for `npm`
|
||
5. Enter `drop database npm;`
|
||
6. Enter `SHOW DATABASES;` and make sure `npm` is gone
|
||
7. Run `create database npm;`
|
||
8. Reboot your Raspberry Pi and try logging in again after a few minutes.
|
||
|
||
</details>
|
||
|
||
#### 4. Set up your proxies
|
||
|
||
The fist proxie I would set up is your Pi's IP address to direct you to your Homer Dashboard.
|
||
|
||
Enter your Pi's IP in the `Domain Names` filed, leave the Scheme as `http`, enter your Pi's IP again in the `Forward Hostname / IP` field, and enter your Homer port from Portainer (`8902`) in the `Forward Port` field.
|
||
|
||
When setting up other domains the `Forward Hostname / IP` will always be your Pi's IP if you are trying to expose one of your Portainer containers, and your `Forward Port` can be found in Portainer. Some containers, such as NextCloud, may require the scheme to be `https`.
|
||
|
||
When adding external access make sure to enable `Block Common Exploits`, I would also suggest going to the SSL tab and selecting `Request a new SSL Certificate`.
|
||
|
||
</details>
|
||
|
||
<details>
|
||
<summary><h2>Setting up external access with external URL and <a href="https://www.cloudflare.com/dns/" target="_blank">Cloudflare</a> </h2></summary>
|
||
|
||
Presuming you have already set up [Nginx Proxy Manager](#setting-up-nginx-proxy-manager) we'll quickly go over exposing your new containers to the world so you can access them from outside of your network.
|
||
|
||
Set up a URL with your favorite domain registrar.
|
||
|
||
Go to [CloudFlare](https://www.cloudflare.com/dns/) and set up an account, when your in the dashboard find `Add site` and enter your new URL, select the tier you want (there is a free tier!) and continue.
|
||
|
||
You will want to create an `A` record, set the name as your new domain, and content to your external network IP (you can Google `What is my IP?` or just head over to https://whatismyipaddress.com/). If you want to set up subdomains set up a `CNAME` record with the `Name` as the subdomain you want and content as your new domain so you will have something similar to below for `blog.coolsite.com` and `www.coolsite.com`:
|
||
|
||
| Type | Name | Content |
|
||
| ------ |:------------:| ------------:|
|
||
| A | coolsite.com | [externalIP] |
|
||
| CNAME | www | coolsite.com |
|
||
| CNAME | blog | coolsite.com |
|
||
|
||
Click continue, at the bottom of the next page you will see `Add Cloudflare's nameservers`, take a note of these and we'll head back over to your domain registrar.
|
||
|
||
In the client area of your registrar set custom nameservers to the two nameservers from Cloudflare. (*Registrars can take 24 hours to process nameserver updates. You should receive an email when your site is active on Cloudflare.*)
|
||
|
||
Go back to Cloudflare and click `Done, check nameservers` and you should be good to go. Give it some time for changes to propogate and try your new domain, if you have tried it beofre and it still fails trying clearing your cache or visiting it in a private session.
|
||
|
||
If you are using a home network with a dynamic IP address you will want to set your system up to automatically update your IP on Cloudflare. :warning: This does not work for `.tk` or other free domains, you will need to manually update Cloudflare.
|
||
1. On the `Overview` page you should see an API section near the bottom, click `Get your API token`
|
||
2. On the next page click `Create Token`
|
||
3. Find Edit zone DNS and click `Use template`
|
||
4. Under Zone Resources select your domain or change `Specific zone` to `All zones`, click `Continue to summary`
|
||
5. Click `Create Token`
|
||
6. Copy token.
|
||
7. Head over to Portainer and look for `Cloudflare DDNS`
|
||
8. Paste your API token in `CF_API_Token`
|
||
9. Enter your domain (in the example above it would be `coolsite.com`)
|
||
10. Deploy the container
|
||
|
||
Go to the Nginx Proxy Manager dashboard and set up your domain to the container you wish (in our example `coolsite.com` would be to one container, and `blog.coolsite.com` would be to another. (`www.coolsite.com` should be set up as another proxy to go to the same place as `coolsite.com`)
|
||
|
||
</details>
|
||
|
||
<details>
|
||
<summary><h2>Setting Discord alerts with <a href="https://github.com/louislam/uptime-kuma" target="_blank">Uptime Kuma</a></h2></summary>
|
||
|
||
When setting up notifications from Uptime Kuma to Discord you can use embed formatting in the prefix custom message:
|
||
|
||
| Type | embed format | Output |
|
||
| --------------------- |:-------------------:| -------------:|
|
||
| Menion user name | <@Discord_User_ID> | @Discord_user |
|
||
| Mention user nickname | <@!Discord_User_ID> | @Discord |
|
||
| Mention channel | <#Channel_ID> | #How_to |
|
||
| Mention role | <@&Role_ID> | @Admins |
|
||
| Custom emoji | <:Name:ID> | 🔥 |
|
||
|
||
</details>
|
||
|
||
<details>
|
||
## <summary><h2>Make <a href="https://github.com/docker-library/docs/tree/master/wordpress" target="_blank">Wordpress</a> accessible externally with <a href="https://www.cloudflare.com/dns/" target="_blank">Cloudflare</a> and <a href="https://github.com/pi-hosted/pi-hosted/blob/master/docs/nginx_proxy_manager.md" target="_blank">Nginx Proxy Manager</a></h2></summary>
|
||
|
||
#### 1. Setting your URL on Wordpress
|
||
|
||
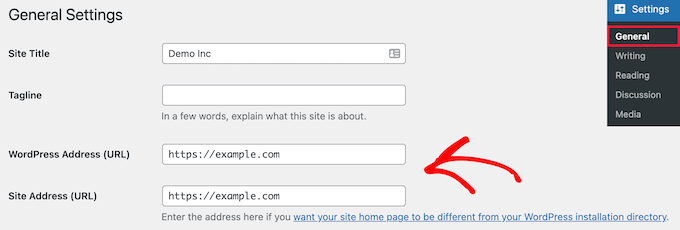
On Wordpress set your URL on the admin dashboard under `Settings` > `General`:
|
||
|
||
|
||
|
||
#### 2. Adding a redirect and SSL certificate to your Wordpress on Nginx Proxy Manager
|
||
|
||
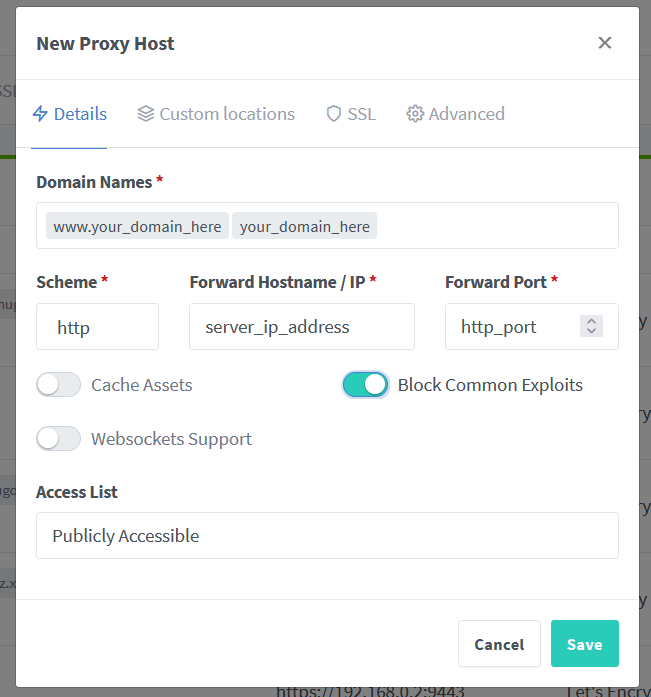
Add your domain with and without the *WWW* prefix to your Domain Names, set the IP address to your Pi hosting Portainer and port to Wordpress (`5080` by default), and select `Block Common Exploits`:
|
||
|
||
|
||
|
||
Navigate to the `SSL` tab, agree to the terms of service and save:
|
||
|
||

|
||
|
||
It may take some time but your SSL tab should look like the below once all is done, I have turned on `Force SSL`, `HTTP/2 Support`, and `HSTS Enabled`:
|
||
|
||

|
||
|
||
#### 3. Extra steps required on Cloudflare</h3>
|
||
|
||
If you haven't already set up Cloudflare check out the [Setting up external access with external URL and Cloudflare](README.md#setting-up-external-access-with-external-url-and-cloudflare-) section.
|
||
|
||
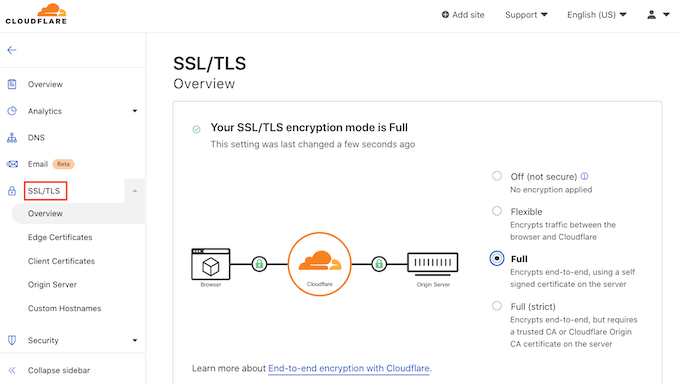
On Cloudflare, under `SSL/TLS` > `Overview` ensure `Full` or `Full (Strict)` is selected, before setting this my Wordpress site would not load:
|
||
|
||
|
||
|
||
</details>
|
||
|
||
<details>
|
||
<summary><h2>Setting up <a href="https://vikunja.io/docs/full-docker-example/" target="_blank">Vikunja</a></h2></summary>
|
||
|
||
Run the below:
|
||
```
|
||
wget -qO- https://raw.githubusercontent.com/pi-hosted/pi-hosted/master/tools/install_vikunja.sh | bash
|
||
```
|
||
|
||
Find the Vikunja template in the App Templates list and click it, fill in the required fields and update your `TZ`, and click `Deploy the container`.
|
||
|
||
In Portainer go to `Stacks` > `vikunja`, and click on `Stop this stack`, then go to `Editor`.
|
||
|
||
#### Things to configure
|
||
|
||
Here there are a few things you can edit, I'll let you know which line does what.
|
||
|
||
I removed `TZ` under the API and added `VIKUNJA_SERVICE_TIMEZONE` which is your servers timezone, and `VIKUNJA_DEFAULTSETTINGS_TIMEZONE` which is your users default timezone.
|
||
|
||
To add email services (such as password resets, email reminders, service messages, etc.) you'll need to add the below and insert your appropriate details:
|
||
```
|
||
VIKUNJA_MAILER_HOST: <smtp_host>
|
||
VIKUNJA_MAILER_PORT: 587
|
||
VIKUNJA_MAILER_USERNAME: <name>@<domain>.com
|
||
VIKUNJA_MAILER_PASSWORD: <password>
|
||
VIKUNJA_MAILER_FROMEMAIL: <name>@<domain>.com
|
||
VIKUNJA_DEFAULTSETTINGS_EMAIL_REMINDERS_ENABLED: true
|
||
```
|
||
|
||
If you have set up all the accounts you want, and want to disable registration for new users add `VIKUNJA_SERVICE_ENABLEREGISTRATION: false`, you can remove this line or stop the stack and change this to `true` if you want to enable registration again.
|
||
|
||
By default Vikunja sets the first day of the week to Sunday (`0`), you can change this to Monday by setting `VIKUNJA_DEFAULTSETTINGS_WEEK_START: 1`.
|
||
|
||
Once you've updated all these the `api` section should look like the below:
|
||
```
|
||
api:
|
||
container_name: api
|
||
hostname: api
|
||
image: vikunja/api:latest
|
||
environment:
|
||
VIKUNJA_SERVICE_TIMEZONE: ${TZ}
|
||
VIKUNJA_DEFAULTSETTINGS_TIMEZONE: ${TZ}
|
||
VIKUNJA_DATABASE_HOST: 'mariadb'
|
||
VIKUNJA_DATABASE_USER: ${DATABASE_USER}
|
||
VIKUNJA_DATABASE_PASSWORD: ${DATABASE_PASSWORD}
|
||
VIKUNJA_DATABASE_DATABASE: ${DATABASE_NAME}
|
||
VIKUNJA_DATABASE_TYPE: mysql
|
||
VIKUNJA_MAILER_ENABLED: true
|
||
VIKUNJA_MAILER_HOST: <smtp_host>
|
||
VIKUNJA_MAILER_PORT: 587
|
||
VIKUNJA_MAILER_USERNAME: <name>@<domain>.com
|
||
VIKUNJA_MAILER_PASSWORD: <password>
|
||
VIKUNJA_MAILER_FROMEMAIL: <name>@<domain>.com
|
||
VIKUNJA_DEFAULTSETTINGS_EMAIL_REMINDERS_ENABLED: true
|
||
VIKUNJA_SERVICE_ENABLEREGISTRATION: false
|
||
VIKUNJA_DEFAULTSETTINGS_WEEK_START: 1
|
||
networks:
|
||
- network
|
||
restart: unless-stopped
|
||
volumes:
|
||
- /portainer/Files/AppData/Config/Vikunja/files:/app/vikunja/files
|
||
depends_on:
|
||
- mariadb
|
||
```
|
||
|
||
Just click `Update the stack` and your changes should be implimented, you can find a full list of environmental vaiables on the <a href="https://vikunja.io/docs/full-docker-example/" target="_blank">Vikunja docs</a> page.
|
||
</details>
|
||
|
||
<details>
|
||
<summary><h2>Setting up <a href="https://www.hesk.com/" target="_blank">Hesk</a></h2></summary>
|
||
|
||
:warning: You will need a working database with a username and password set up, such as the `mariadb` container. :warning:
|
||
|
||
Go to the [download page](https://www.hesk.com/download.php) of HESK and download HESK free.
|
||
|
||
Find the nginx template in the App Templates list and click it, then click `Show advanced options` and change the `Host` ports to some free ports for your portainer.
|
||
|
||
|
||
Change the `Name` to something more appropriate, such as `help-desk`.
|
||
|
||
Add volume mapping from your container:
|
||
```
|
||
/config
|
||
```
|
||
|
||
Set to `Bind` to:
|
||
```
|
||
/portainer/Files/AppData/Config/help-desk
|
||
```
|
||
|
||
Then click `Deploy the container`.
|
||
|
||
Extract the zip we downloaded earlier to `/portainer/Files/AppData/Config/help-desk/www`
|
||
|
||
Hesk comes with its own tutorial in the downloaded zip, just look for the `readme.html` file and follow their instructions once you've set up your Nginx container. I've put a brief summary and some changes below.
|
||
|
||
Navigate in your browser to `https://<your-containers_ip:<port>/install` and:
|
||
1. Read the HESK License agreement and confirm that you agree with the terms.
|
||
2. The script will test your server to see if all required settings are correct and advise solutions to any problems.
|
||
3. Enter your database settings, and the setup script will test them.
|
||
4. If everything is OK the script will install MySQL tables.
|
||
|
||
:warning: Before closing the installation script, **DELETE** the "install" directory from your server! :warning:
|
||
```
|
||
/portainer/Files/AppData/Config/help-desk/www/install
|
||
```
|
||
|
||
Click the `Continue` link in the install script or open the admin folder in your browser by navigating to `https://<your-containers_ip:<port>/admin/`
|
||
|
||
In the admin console go through each of the tabs and set things up as desired.
|
||
|
||
Replace `https://<your-containers_ip:<port>/` above with any URL you have set in your proxy manager, your service desk agents can view and respond to tickets by adding `/admin` to the URL and logging in, your end users will just need to visit the base URL.
|
||
|
||
</details> |